This guide helps field users identify potential issues with Wi-Fi on location and provides instructions for setting up and troubleshooting an Access Point.
TABLE OF CONTENTS
Hardware Requirements
1. Required Components
- Access Point
- Power adapter with POE and LAN ports
- Ethernet cables (one for the Access Point and another for connection to the router or data source)
- Diagram of Access Point setup (refer to the provided image)
2. Correct Port Usage
- POE Port: Connects to the Access Point (Power over Ethernet).
- LAN Port: Connects to the cellular source, router, or data source.
3. Installation Considerations
- Ensure clear line of sight between Access Points for optimal connectivity. Minimize obstructions.
- Install Access Points with antennas up to avoid water ingress, which may cause failure.
4. Common Issues
- Loose connections: Check all Ethernet connections.
- Damaged cables: Inspect and replace Ethernet cables if necessary.
- Persistent connection issues: Bring the Access Point into the logger, connect it to a power source, and check if it connects successfully inside the logger.

Omada: Login & Navigation
Access the Omada Dashboard:
- Open a browser and navigate to https://localhost:8043.
- Obtain credentials from the Dipole Support team.
Navigate to Devices Page:
- Use the navigation bar on the left side to access the Devices page.
- This page displays all paired Access Points and their statuses.
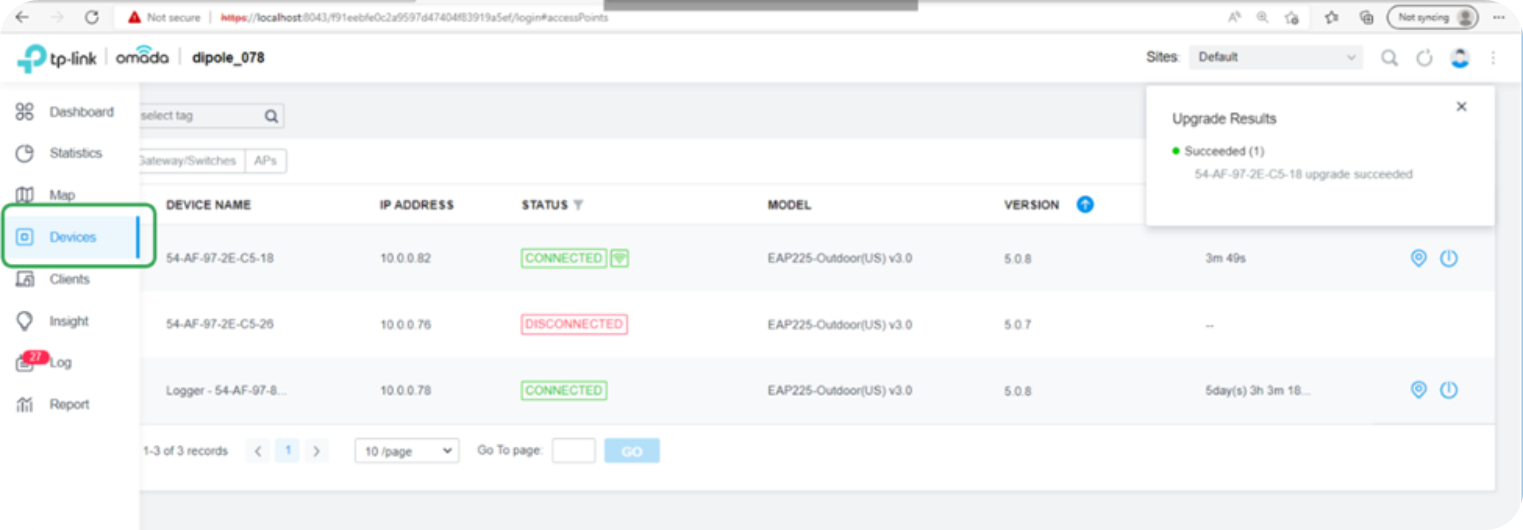
Identify Access Points:
- Main Logger Access Point:
- The central Access Point does not display a Wi-Fi icon to the right of its name (circled in green).
- Additional Access Points:
- Connected Access Points show a Wi-Fi icon next to their name (circled in blue).
- Disconnected Access Points:
- Appear as "Disconnected".

- Appear as "Disconnected".
- Main Logger Access Point:
Omada: Troubleshooting
1. Status: "PENDING"
- Indicates a new Access Point that needs to be paired.
- How to Adopt:
- Locate the Access Point on the Devices page.
- Click anywhere on the Access Point (circled in green in the diagram).
- On the far-right panel, click Adopt Now (circled in red).
- Wait for the adoption process to complete. The Access Point should now show as Connected.
2. Status: "Managed by Others"
Occurs when an Access Point is paired with another unit but available for your network.

Solution 1: Try to Adopt
- Attempt to adopt the Access Point via the Devices page.
- Enter credentials when prompted (contact Dipole Support if needed).
Solution 2: Factory Reset
- If adoption fails, perform a factory reset. Follow the Factory Reset Instructions starting from Step 7.
- Re-adopt the Access Point once the reset is complete.

Important Safety Notes:
- Ensure all Ethernet connections are secure before troubleshooting.
- Protect Access Points from environmental damage by installing them in weather-resistant locations with antennas up.
Was this article helpful?
That’s Great!
Thank you for your feedback
Sorry! We couldn't be helpful
Thank you for your feedback
Feedback sent
We appreciate your effort and will try to fix the article